SQL script batch execution using sqlcmd in PowerShell

There is often a mismatch between needs of the development team (multiple discreet T-SQL files for separate concerns) and the release team (the requirement  for one step automated deployment) . The script bridges the requirement by using sqlcmd.exe to run a batch of SQL scripts.

A text file is used listing all sql files that need to run in a particular order to avoid errors which may occur if there are dependencies between the scripts. Instead of using a text file a number can be prefixed to the scripts based on the order they need to run.

The script expects two parameters –

  • Path of folder containing the set of T-SQL files (and the manifest file, see below)
  • Connection string

The script can be downloaded from technet gallery.

## Provide the path name of the SQL scripts folder and connnection string
##.\SQLBatchProcessing.ps1 -SQLScriptsFolderPath "C:\Sql Batch Processing\SQLScripts" -ConnectionString "DEV-DB-01"
Param(
[Parameter(Mandatory=$true)][String]$ConnectionString ,
[Parameter(Mandatory=$true)][String]$SQLScriptsFolderPath
)
Set-ExecutionPolicy -ExecutionPolicy:Bypass -Force -Confirm:$false -Scope CurrentUser
Clear-Host
#check whether the SQL Script Path exists
$SQLScriptsPath = Resolve-Path $SQLScriptsFolderPath -ErrorAction Stop
#a manifest file will exisit in the SQL scripts folder detailing the order the scripts need to run.
$SQLScriptsManifestPath = $SQLScriptsFolderPath + "\Manifest.txt"
#Find out whether the manifest file exists in the the SQL Scripts folder
$SQLScriptsManifestPath = Resolve-Path $SQLScriptsManifestPath -ErrorAction Stop


#if manifest file found iterate through each line , validate if corresponding SQL script exists in file before running each of them
Get-Content $SQLScriptsManifestPath | ForEach-Object {
$SQLScriptsPath = $SQLScriptsFolderPath + "\" + $_.ToString()
Resolve-Path $SQLScriptsPath -ErrorAction Stop
}
$SQLScriptsLogPath = $SQLScriptsFolderPath + "\" + "SQLLog.txt"
Add-Content -Path $SQLScriptsLogPath -Value "***************************************************************************************************"
Add-Content -Path $SQLScriptsLogPath -Value "Started processing at [$([DateTime]::Now)]."
Add-Content -Path $SQLScriptsLogPath -Value "***************************************************************************************************"
Add-Content -Path $SQLScriptsLogPath -Value ""
Get-Content $SQLScriptsManifestPath | ForEach-Object {
$SQLScriptsPath = $SQLScriptsFolderPath + "\" + $_.ToString()
$text = "Running script " + $_.ToString();
Add-Content -Path $SQLScriptsLogPath -Value $text
sqlcmd -S "DEV-DB-01" -i $SQLScriptsPath | Out-File -Append -filepath $SQLScriptsLogPath
}
Add-Content -Path $SQLScriptsLogPath -Value "***************************************************************************************************"
Add-Content -Path $SQLScriptsLogPath -Value "End processing at [$([DateTime]::Now)]."
Add-Content -Path $SQLScriptsLogPath -Value "***************************************************************************************************"
Add-Content -Path $SQLScriptsLogPath -Value ""

Create Dev/Test SharePoint 2013 environment in Azure

Azure has a trial image to build either SharePoint 2013 HA farm or SharePoint 2013 Non-HA farm.

When trying to create SharePoint 2013 Non-HA farm, I was stuck at step “Choose storage account type” with the message “Loading pricing…”.

hangingselectstorageaccounttypefromazure

Following SharePoint Server 2016 dev/test environment in Azure, I managed to created a SharePoint 2013 environment in Azure running PowerShell commands.

There are three major phases to setting up this dev/test environment:

  1. Set up the virtual network and domain controller (ad2013VM).I followed all steps described in Phase 1: Deploy the virtual network and a domain controller to set up the virtual network and domain controller
  2. Configure the SQL Server computer (sql2012VM).I followed all steps from Phase 2: Add and configure a SQL Server 2014 virtual machine to create the SQL server computer with few changes to the PowerShell script to create a SQL2012R2 machine.
  3. Configure the SharePoint server (sp2013VM).                                                                               I followed all steps from Phase 3: Add and configure a SharePoint Server 2016 virtual machine with few changes to the script to create a SharePoint 2013 virtual machine.

Configure the SQL Server computer (sql2012VM).

I needed to get the name of SQL 2012 SP2 Azure image offer. I can list all SQL Azure image offers using the cmdlet Get-AzureRMImageOffer.

Get-AzureRmVMImageOffer -Location "westeurope" 
-PublisherName "MicrosoftSQlServer"

get-azurermimageoffersql

The following SQL Image Offers are available

Offer
-----
SQL2008R2SP3-WS2008R2SP1
SQL2008R2SP3-WS2012
SQL2012SP2-WS2012
SQL2012SP2-WS2012R2
SQL2012SP3-WS2012R2
SQL2012SP3-WS2012R2-BYOL
SQL2014-WS2012R2
SQL2014SP1-WS2012R2
SQL2014SP1-WS2012R2-BYOL
SQL2014SP2-WS2012R2
SQL2014SP2-WS2012R2-BYOL
SQL2016-WS2012R2
SQL2016-WS2012R2-BYOL
SQL2016-WS2016
SQL2016-WS2016-BYOL
SQL2016CTP3-WS2012R2
SQL2016CTP3.1-WS2012R2
SQL2016CTP3.2-WS2012R2
SQL2016RC3-WS2012R2v2
SQL2016SP1-WS2016
SQL2016SP1-WS2016-BYOL
SQLvNextRHEL

I was interested in SQL 2012 SP2 Standard version. Fortunately the Azure Image Offer Names are intuitive, e.g. Name SQL2012SP2-WS2012R2 means windows server 2012 R2 virtual machine with SQL Server 2012 SP2 installed.

I also needed the SKU value of the SQL 2012 SP2 using the cmdlet Get-AzureRmVMImageSKU

 Get-AzureRmVMImageSKU -Location "westeurope" -PublisherName "MicrosoftSQlServer" 
-Offer SQL2012SP2-WS2012R2|format-table Skus

The following SKUs for SQL2012SP2-WS2012R2 are available

Skus
----
Enterprise
Enterprise-Optimized-for-DW
Enterprise-Optimized-for-OLTP
Standard
Web


# Log in to Azure
Login-AzureRmAccount
# Set up key variables
$subscrName="<name of your Azure subscription>" — "Visual Studio Premium with MSDN"
$rgName="<your resource group name>" — "SharePoint-2013"
$locName="<the Azure location of your resource group>" — "WestEurope"
$dnsName="<unique, public domain name label for the SQL server>" — "sp2013-db-01"
# Set the Azure subscription
Get-AzureRmSubscription -SubscriptionName $subscrName | Select-AzureRmSubscription
# Get the Azure storage account name
$sa=Get-AzureRMStorageaccount | where {$_.ResourceGroupName -eq $rgName}
$saName=$sa.StorageAccountName
# Create an availability set for SQL Server virtual machines
New-AzureRMAvailabilitySet -Name sqlAvailabilitySet -ResourceGroupName $rgName -Location $locName
# Create the SQL Server virtual machine
$vmName="sql2012VM"
$vmSize="Standard_D3_V2"
$vnet=Get-AzureRMVirtualNetwork -Name "SP2013Vnet" -ResourceGroupName $rgName
$nicName=$vmName + "-NIC"
$pipName=$vmName + "-PublicIP"
$pip=New-AzureRMPublicIpAddress -Name $pipName -ResourceGroupName $rgName -DomainNameLabel $dnsName -Location $locName -AllocationMethod Dynamic
$nic=New-AzureRMNetworkInterface -Name $nicName -ResourceGroupName $rgName -Location $locName -SubnetId $vnet.Subnets[0].Id -PublicIpAddressId $pip.Id -PrivateIpAddress "10.0.0.11"
$avSet=Get-AzureRMAvailabilitySet -Name sqlAvailabilitySet -ResourceGroupName $rgName
$vm=New-AzureRMVMConfig -VMName $vmName -VMSize $vmSize -AvailabilitySetId $avSet.Id
$diskSize=100
$diskLabel="SQLData"
$storageAcc=Get-AzureRMStorageAccount -ResourceGroupName $rgName -Name $saName
$vhdURI=$storageAcc.PrimaryEndpoints.Blob.ToString() + "vhds/" + $vmName + "-SQLDataDisk.vhd"
Add-AzureRMVMDataDisk -VM $vm -Name $diskLabel -DiskSizeInGB $diskSize -VhdUri $vhdURI -CreateOption empty
$cred=Get-Credential -Message "Type the name and password of the local administrator account of the SQL Server computer."
$vm=Set-AzureRMVMOperatingSystem -VM $vm -Windows -ComputerName $vmName -Credential $cred -ProvisionVMAgent -EnableAutoUpdate
$vm=Set-AzureRMVMSourceImage -VM $vm -PublisherName MicrosoftSQLServer -Offer SQL2012SP2-WS2012R2 -Skus Standard -Version "latest"
$vm=Add-AzureRMVMNetworkInterface -VM $vm -Id $nic.Id
$storageAcc=Get-AzureRMStorageAccount -ResourceGroupName $rgName -Name $saName
$osDiskUri=$storageAcc.PrimaryEndpoints.Blob.ToString() + "vhds/" + $vmName + "-OSDiskres.vhd"
$vm=Set-AzureRMVMOSDisk -VM $vm -Name "OSDisk" -VhdUri $osDiskUri -CreateOption fromImage
New-AzureRMVM -ResourceGroupName $rgName -Location $locName -VM $vm

The changes from the original script are on the following lines

  • line 21: “sql2012VM” stored in variable $vmName
  • line 23: $vnet=Get-AzureRMVirtualNetwork -Name “SP2013Vnet” -ResourceGroupName $rgName
  • line 40 : $vm=Set-AzureRMVMSourceImage -VM $vm -PublisherName MicrosoftSQLServer -Offer SQL2012SP2-WS2012R2 -Skus Standard -Version “latest”

Configure the SharePoint server (sp2013VM).

Similarly to creating the SQL virtual machine, I needed the Azure Image Offer Name for SharePoint 2013.

The available SharePoint Azure Image offers for Microsoft SharePoint can be retrieved using the cmdlet below.

Get-AzureRmVMImageOffer -Location "westeurope" 
-PublisherName "MicrosoftSharePoint"

Only one result “MicrosoftSharePointServer” is returned.

To get the available SKUs for “MicrosoftSharePointServer”, the cmdlet below can be run.

 Get-AzureRmVMImageSKU -Location "westeurope" -PublisherName "MicrosoftSharePointServer" 
|format-table Skus

get-azurermimageoffersharepoint

Two results are returned : “2013” and “2016”. I am interested in the “2013” value which refers to the Microsoft SharePoint Server 2013 version.


# Set up key variables
$subscrName="<name of your Azure subscription>" — "Visual Studio Premium with MSDN"
$rgName="<your resource group name>" — "SharePoint-2013"
$locName="<the Azure location of your resource group>" — "WestEurope"
$dnsName="<unique, public domain name label for the SharePoint server>" –"sp2013-app-01"
# Set the Azure subscription
Get-AzureRmSubscription -SubscriptionName $subscrName | Select-AzureRmSubscription
# Get the Azure storage account name
$sa=Get-AzureRMStorageaccount | where {$_.ResourceGroupName -eq $rgName}
$saName=$sa.StorageAccountName –sharepoint2013resstorage
# Create an availability set for SharePoint virtual machines
New-AzureRMAvailabilitySet -Name spAvailabilitySet -ResourceGroupName $rgName -Location $locName
# Specify the virtual machine name and size
$vmName="sp2013VM"
$vmSize="Standard_D3_V2"
$vm=New-AzureRMVMConfig -VMName $vmName -VMSize $vmSize
# Create the NIC for the virtual machine
$nicName=$vmName + "-NIC"
$pipName=$vmName + "-PublicIP"
$pip=New-AzureRMPublicIpAddress -Name $pipName -ResourceGroupName $rgName -DomainNameLabel $dnsName -Location $locName -AllocationMethod Dynamic
$vnet=Get-AzureRMVirtualNetwork -Name "SP2013Vnet" -ResourceGroupName $rgName
$nic=New-AzureRMNetworkInterface -Name $nicName -ResourceGroupName $rgName -Location $locName -SubnetId $vnet.Subnets[0].Id -PublicIpAddressId $pip.Id -PrivateIpAddress "10.0.0.12"
$avSet=Get-AzureRMAvailabilitySet -Name spAvailabilitySet -ResourceGroupName $rgName
$vm=New-AzureRMVMConfig -VMName $vmName -VMSize $vmSize -AvailabilitySetId $avSet.Id
# Specify the image and local administrator account, and then add the NIC
$pubName="MicrosoftSharePoint"
$offerName="MicrosoftSharePointServer"
$skuName="2013"
$cred=Get-Credential -Message "Type the name and password of the local administrator account."
$vm=Set-AzureRMVMOperatingSystem -VM $vm -Windows -ComputerName $vmName -Credential $cred -ProvisionVMAgent -EnableAutoUpdate
$vm=Set-AzureRMVMSourceImage -VM $vm -PublisherName $pubName -Offer $offerName -Skus $skuName -Version "latest"
$vm=Add-AzureRMVMNetworkInterface -VM $vm -Id $nic.Id
# Specify the OS disk name and create the VM
$diskName="OSDisk"
$storageAcc=Get-AzureRMStorageAccount -ResourceGroupName $rgName -Name $saName
$osDiskUri=$storageAcc.PrimaryEndpoints.Blob.ToString() + "vhds/" + $vmName + $diskName + ".vhd"
$vm=Set-AzureRMVMOSDisk -VM $vm -Name $diskName -VhdUri $osDiskUri -CreateOption fromImage
New-AzureRMVM -ResourceGroupName $rgName -Location $locName -VM $vm

The changes from the original script are on the following lines

  • line 18: $vmName=“sp2013VM”
  • line 26:$vnet=Get-AzureRMVirtualNetwork -Name “SP2013Vnet” -ResourceGroupName $rgName
  • line 34: $skuName=“2013”

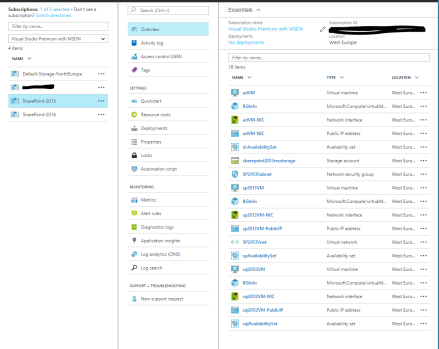
The end result of the PowerShell scripts is a resource group with the virtual machines (adVm, sp2013Vm and sql2012VM), network interfaces, availability sets, storage account and public IP addresses to enable SharePoint 2013 to run in Azure VMs.


sharepoint2013resourcegroup